Create an asynchronous plug-in registered on the Create message of the account table. The plug-in will create a task activity that will remind the creator of the account.
Prerequisites
- Visual Studio 2017 or latest version.
- Download the Plugin Registration tool.
- Information about downloading the plugin registration tool is at Download tools from NuGet.
- The topic includes instructions to use a Power Shell script to download the latest tools from NuGet.
Create a Visual Studio project for the plug-in
Open Visual Studio and open a new Class Library (.NET Framework) project using .NET Framework 4.6.2

The name used for the project will be the name of the assembly. This tutorial uses the name Basic Plugin.
In Solution Explorer, right-click the project and select Manage NuGet Packages… from the context menu.

Select Browse and search for Microsoft.CrmSdk.CoreAssemblies and install the latest version

You must select I Accept in the License Acceptance dialog
In Solution Explorer, right-click the Class1.cs file and choose Rename in the context menu

Rename the Class1.cs file to Follow-up Plugin.cs.
When prompted, allow Visual Studio to re-name the class to match the file name.

Edit the class file to enable a Plug-in
Add the following using statements to the top of the FollowupPlugin.cs file:
public class FollowupPlugin:Iplugin
{
public void executive (IServiceProvider ServiceProvider)
{ throw new NotImplementedException();
}
}
Replace the contents of the Execute method with the following code:
// Obtain the tracing service
ITracingService tracingService =
(ITracingService)serviceProvider.GetService(typeof(ITracingService));
// Obtain the execution context from the service provider.
IPluginExecutionContext context = (IPluginExecutionContext)
serviceProvider.GetService(typeof(IPluginExecutionContext));
// The InputParameters collection contains all the data passed in the message request.
if (context.InputParameters.Contains(“Target”) &&
context.InputParameters[“Target”] is Entity)
{
// Obtain the target entity from the input parameters.
Entity entity = (Entity)context.InputParameters[“Target”];
// Obtain the organization service reference which you will need for
// web service calls.
IOrganizationServiceFactory serviceFactory =
(IOrganizationServiceFactory)serviceProvider.GetService(typeof(IOrganizationServiceFactory));
IOrganizationService service = serviceFactory.CreateOrganizationService(context.UserId);
try
{
// Plug-in business logic goes here.
}
catch (FaultException<OrganizationServiceFault> ex)
{
throw new InvalidPluginExecutionException(“An error occurred in FollowUpPlugin.”, ex);
}
catch (Exception ex)
{
tracingService.Trace(“FollowUpPlugin: {0}”, ex.ToString());
throw;
}
}
Add the following code to the try block. Replace the comment: // Plug-in business logic goes here. with the following:
// Create a task activity to follow up with the account customer in 7 days.
Entity followup = new Entity(“task”);
followup[“subject”] = “Send e-mail to the new customer.”;
followup[“description”] =
“Follow up with the customer. Check if there are any new issues that need resolution.”;
followup[“scheduledstart”] = DateTime.Now.AddDays(7);
followup[“scheduledend”] = DateTime.Now.AddDays(7);
followup[“category”] = context.PrimaryEntityName;
// Refer to the account in the task activity.
if (context.OutputParameters.Contains(“id”))
{
Guid regardingobjectid = new Guid(context.OutputParameters[“id”].ToString());
string regardingobjectidType = “account”;
followup[“regardingobjectid”] =
new EntityReference(regardingobjectidType, regardingobjectid);
}
// Create the task in Microsoft Dynamics CRM.
tracingService.Trace(“FollowupPlugin: Creating the task activity.”);
service.Create(followup);
The Id of the account being created is found in the context OutputParameters and set as the regardingobjectid lookup column for the task.
Build Plug-In
In Visual Studio Explorer, Press F6 to build the assembly. verify that it complies without error.
Sign the Plug-In
In Solution Explore, right click the basic Plugin project and in the context, menu select properties

In the project properties, select the Signing tab and select the Sign the assembly checkbox

In the Choose a strong name key file: dropdown, select <New…>.
In the Create Strong Name Keydialog, enter a key file name and deselect the Protect my key file with a password checkbox.
Click OK to close the Create Strong Name Key dialog.
In the project properties Build tab, verify that the Configuration is set to Debug.
Press F6 to build the plug-in again.
Using windows explorer, find the built plug-in at: \bin\Debug\BasicPlugin.dll
Register plug-in
To register a plug-in, you will need the Plug-in Registration tool
Connect using the Plug-in Registration tool
After you have downloaded the Plug-in registration tool, click the PluginRegistration.exe to open it.
Click Create new Connection to connect to your instance.
Make sure Office 365 is selected. If you are connecting using a Microsoft account other than one you are currently using, click Show Advanced

Enter your credentials and click Login.
If your Microsoft Account provides access to multiple environments, you will need to choose an environment.
After you are connected, you will see any existing registered plug-ins & custom workflow activities

Register your assembly
- In the Register drop-down, select New Assembly

2.In the Register New Assembly dialog, select the ellipses (…) button and browse to the assembly you built in the previous step

3.For Microsoft 365 users, verify that the isolation mode is set to sandbox and the location to store the assembly is Database.
4.Click Register Selected Plug-ins.
5.You will see a Registered Plug-ins confirmation dialog

6.Click OK to close the dialog and close the Register New Assembly dialog.
7.You should now see the (Assembly) BasicPlugin assembly which you can expand to view the (Plugin) BasicPlugin.FollowUpPlugin plugin

Register a new step
1.Right-click the (Plugin) BasicPlugin.FollowUpPlugin and select Register New Step

2.In the Register New Step dialog, set the following fields
TABLE 1 | |
Setting | Value |
Message | Create |
Primary Entity | account |
Event Pipeline Stage of Execution | Post Operation |
Execution Mode | Asynchronous |

3.Click Register New Step to complete the registration and close the Register New Step dialog.
4.You can now see the registered step

Test plug-in
- Open a model-driven app and create an account table.
- Within a short time, open the account and you can verify the creation of the task.

Register a new step
1.Right-click the (Plugin) BasicPlugin.FollowUpPlugin and select Register New Step

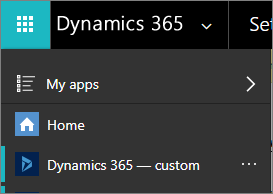
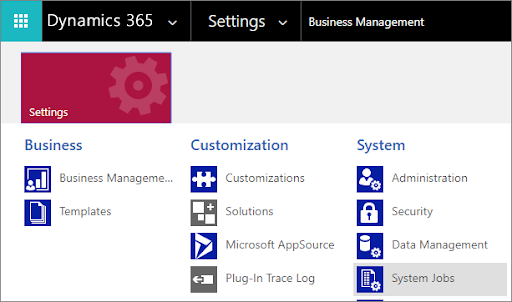
2.In the Dynamics 365 –custom app, navigate to Settings > System > System Jobs.

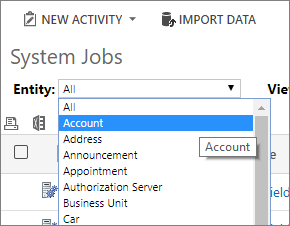
When viewing system jobs, you can filter by Table (Entity). Select Account

For any Help or Queries Contact us Info@crmonce.com or +918096556344

