
Power Platform Introduction :-
Power Platform Pipelines aims to simplify application lifecycle management (ALM) for Power Platform by bringing deployment automation capabilities in a manner that’s approachable for all makers, admins, and developers.
Pipelines deploy solutions as well as configuration for the target environment such as connections, connection references, and environment variables.

Install the pipelines application in your host environment (i.e.Pipelines)
This step is only required for the initial host setup. You may skip to the next section if you already have access to a host environment where you’ll create pipelines.
Sign in to the Power Platform admin center
Install the Power Platform Pipelines application in your host environment by selecting the host environment, then select Resources > Dynamics 365 apps.

Select Install app and scroll down within the right-side panel until you find Power Platform Pipelines and then Select Next, if you agree, accept the terms, and then select Install (it take 2 minutes to installation).

Once installed, the deployment pipelines configuration application will appear in the list of installed apps.
Configure a deployment pipeline
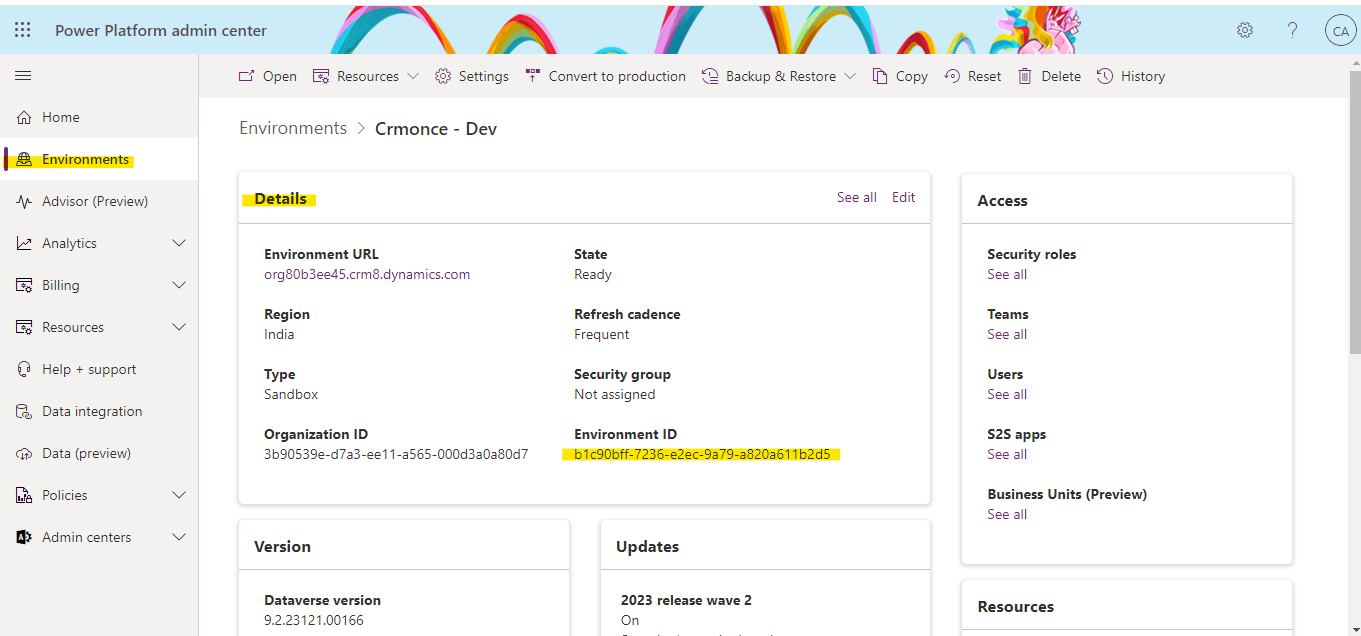
Copy the environment IDs of all development and target Managed Environments that will be linked to pipelines.You’ll need these later.(Sign in to the Power Platform admin center and then Select an environment and review the information in the Details section.)
Once the Deployment Pipeline package installation has completed, go to Power Apps, then select the dedicated host environment (where you installed the application) and then Play the Deployment Pipeline Configuration app.

Select Environments on the left pane, and then select New to create the environment records in Dataverse:
Name :- Enter the name for the environment record. It’s a good idea to include the same name as the actual environment, such as Crmonce – Dev
Environment Type :- Select Development Environment. Select Development Environment for all source environments where unmanaged solutions will be developed
Environment Id:- Be sure to select the correct ID.( shown as above) and then Select Save.
Refresh the form, then verify Validation Status equals Success.

And then next create another environment record in Dataverse :-
Name :- Enter the name for the environment record. It’s a good idea to include the same name as the actual environment, such as Crmonce – SIT
Environment Type :- Select Target Environment. Select Target Environment for QA and production environments where the managed solution artifacts will be deployed.
Environment Id:- Be sure to select the correct ID.( shown as above) and then Select Save.
Refresh the form, then verify Validation Status equals Success.

Select Pipelines on the left navigation pane, and then select New to create a new deployment pipeline:
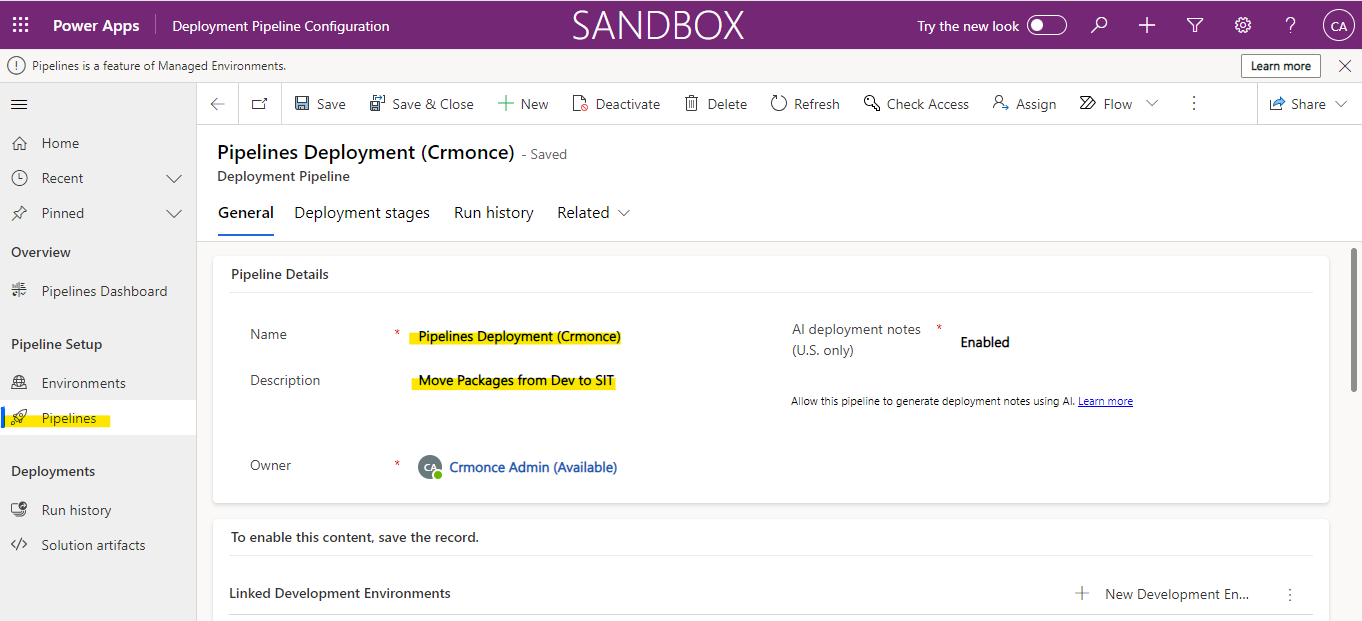
Name:- Enter a name for the pipeline, such as Pipelines Deployment (Crmonce)
Description:- Optionally, enter a meaningful description for the pipeline (Move Packages from to SIT)
Within the Linked Development Environments grid, select Add Existing Development Environment(i.e.Crmonce-Dev), then associate one or more development environments. Note that a pipeline must have at least one development environment and one stage before it can be run.

Within the Deployment Stages grid, select New Deployment Stage and then Enter the details for each stage, and then select Save and Close:
Name:- The name of the stage (i.e.Dev To SIT)
Description (optional):- Optional description for the stage.(i.e.Initial Stage of Deployment)
Previous Deployment Stage (optional):- Specifies a deployment stage that must be deployed to before deploying to the current stage. For example, when creating a production stage, you can add the test stage as the Previous Deployment Stage. Note that for the first stage, or pipelines containing only one stage, this should be left blank.
Target Deployment Environment(i.e.SIT Env ):- This is the target environment where this stage will deploy to.
PreDeployment Step Required (optional):- Deployment requests will be pending until approved via custom business logic. Requires additional configuration
Repeat the previous two steps for each stage you’d like to add to the pipeline. Note that you must have at least one stage. You can add up to seven stages.

Sign in to the Power Platform admin center and then Click on host environment and review the information in the Access section And select users And then click on Manage Security Roles And then scroll down within the right-side panel until you find Deployment Pipeline User and Deployment Pipeline Administrator and then click on save.

Next, navigate to the development environment (Crmonce – Dev), build a solution there, open it, and choose the pipelines icon from the left navigation menu.

Following your click on the Pipelines icon, choose the pipeline you constructed, and then Click on Deploy here.

Once deployment is finished, navigate to the target environment(i.e.Crmonce-SIT) and select Solutions (i.e.Managed)
We have started a new online retail store ![]() Please Visit.
Please Visit.