Let us talk about Data Cleaning
When the executive draws the visualization from the data which intervene from multiple sources with the regular growth of data, it is very much required to Clean -> Transform -> Model the data with aggregation and filter of data. Luckily, Power Query has an incredible number of features that are dedicated to helping you clean and prepare your data for analysis. You will learn how to simplify a complicated model, change data types, rename objects, and pivot data. You will also learn how to profile columns so that you know which columns have the valuable data that you are seeking for deeper analytics.
Step 1 – Transform Data
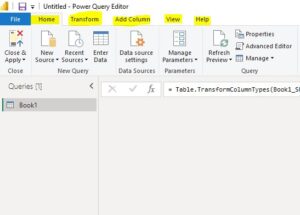
To start shaping your data, open Power Query Editor by selecting the Transform data option on the Home tab of Power BI Desktop as shown in the below image.

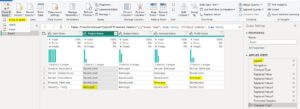
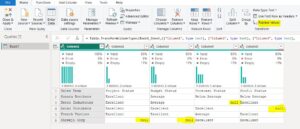
In Power Query Editor, the data in your selected query displays in the middle of the screen and, on the left side, the Queries pane lists the available queries (tables).
When you work in Power Query Editor, all steps that you take to shape your data are recorded. Then, each time the query connects to the data source, it automatically applies your steps, so your data has always shaped the way that you specified. Power Query Editor only makes changes to a particular view of your data, so you can feel confident about changes that are being made to your original data source. You can see a list of your steps on the right side of the screen, in the Query Settings pane, along with the query’s properties.
The Power Query Editor ribbon contains many actions you can use to select the tabs like Home,transform,add column, view,tools and Help it will shape your data.
Step 2 – Data Formating (Check on Column Headers & Names):
The first step in shaping your initial data is to identify the column headers and names within the data and then evaluate where they are located to ensure that they are in the right place. I took excel as a data source with dummy data.
Step 3 – Import Data from Excel
When we import data from excel, we observed data did not import as expected.
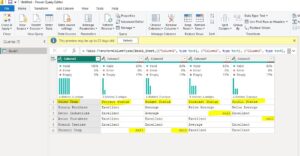
Step 4 – Set First Row as Header:
Consequently, the data is difficult to read. When you have identified where the column headers and names are located, you can make changes to reorganize the data.
Step 5 – Replace Values :
You can use the Replace Values feature in Power Query Editor to replace any value with another value in a selected column.
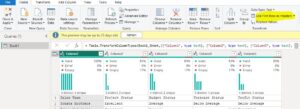
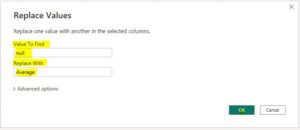
In this example, you notice that, in the project status column, they have some null values i want to correct those cells . Select the column that contains the value that you want to replace and then select Replace Values on the Transform tab.
In the Value to Find box, enter the name of the value that you want to replace, and then in the Replace With box, enter the correct value name and then select OK. In Power Query, you can’t select one cell and change one value, like you might have done in Excel.
You can review the list of steps that you took to restructure and correct your data in the Query Settings pane. When you have completed all steps that you want to take, you can select Close & Apply to close Power Query Editor and apply your changes to your data model. However, you can take further action to clean and transform your data.