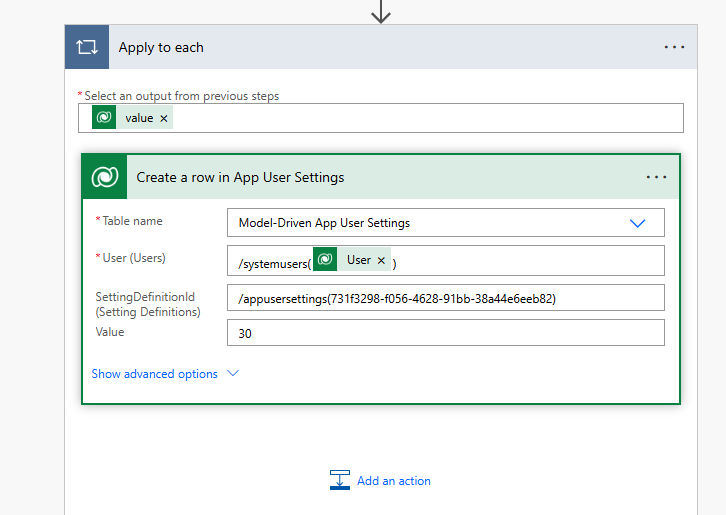
What is Toast Notification in CRM
 

Toast notifications are small messages that appear at the top of the screen when an action is performed, such as creating a record.

They typically disappear after a few seconds, which may not always provide sufficient time for users to read the message.

Benefits of Extended Display Time

This feature is particularly beneficial for users who may need additional time to comprehend the information presented in the notifications.

In Dynamics 365, the default toast notification display time is limited, and while you can extend it, the platform does not natively support customizing the display duration to 30 or 40 seconds directly through the user interface or settings. The maximum duration for toast notifications is typically around 10 seconds.

How To Increase Toast Notification Fade Interval Time For All Users In Organization Using Power Automate

Increase Toast Notification Fade Interval in Model-Driven Apps using Power Automate

 What are we doing?

We’re using Power Automate to update a Dataverse setting for each user that increases the duration (fade interval) of toast notifications in a Model-Driven App.


 Prerequisites

Access to Power Platform environment

Environment with Dataverse

System Admin or equivalent permission

“App User Settings” table & relevant SettingDefinitionId


Step-by-Step Guide
1. Trigger the Flow

Add a manual trigger to test on demand.


2. List System Users

Add a List rows Dataverse action.

Table name: User

Use FetchXML to only get users with access mode = 0 (Full access).

xmlCopyEdit<fetch version=”1.0″ output-format=”xml-platform” mapping=”logical” distinct=”false”>
  <entity name=”systemuser”>
    <attribute name=”fullname”/>
    <attribute name=”businessunitid”/>
    <attribute name=”title”/>
    <attribute name=”address1_telephone1″/>
    <attribute name=”positionid”/>
    <attribute name=”systemuserid”/>
    <order attribute=”createdon” descending=”false”/>
    <filter type=”and”>
      <condition attribute=”accessmode” operator=”eq” value=”0″/>
    </filter>
  </entity></fetch>

3. Loop Through Users

Add an Apply to each loop

From the List Users  step → select value.

Step 1: “Apply to each”

Purpose: This loop goes through a list of system users.

Input: @{outputs('List_System_Users')?['body/value']}

This means it’s using the output from a previous step (likely a “List records” action that retrieved users from the systemusers table).

value is the array of users returned by that step.

So: For each user in that list, it will repeat the actions inside the loop.

Step 2: “Create a row in App User Settings”

This action is inside the loop, so it happens once for each user.

 Table name:Model-Driven App User Settings

This is a Dataverse table used to store settings for users in model-driven apps.


User (Users):

Value: /systemusers({User})

The {User} here is dynamically coming from the loop (i.e., the current user record).

This sets which user the app setting will be applied to.

SettingDefinitionId (Setting Definitions):

Value: /appusersettings(731f3298-f056-4628-91bb-38a42)

This is the specific setting you’re configuring (like default page size, theme, etc.).

This ID uniquely identifies the setting.

Value:

Value: 30

This is the actual setting value you want to assign (in this case, possibly page size or another numeric setting).

What This Flow Does:

1.Retrieves a list of users.

2.Loops through each user.

3.For each user, creates a new “Model-Driven App User Setting” record, setting:

The user reference

The setting definition (identified by a GUID)

The setting value (e.g., 30)