Step 1
Login to the required Powerapps environment using URL make.powerapps.com by providing the user name and password and click on Solution on the left-hand side and after chose the required solution as shown in the below figure.
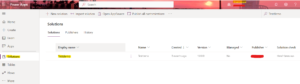
Login to the required Powerapps environment using URL make.powerapps.com by providing the user name and password and click on Solution on the left-hand side and after chose the required solution as shown in the below figure.
Step 2
After Step 1, create a Webresource of type HTML and upload an empty HTML as shown in the below figure.

After Step 1, create a Webresource of type HTML and upload an empty HTML as shown in the below figure.
Step 3
After Step 2, go to the entity and select which form you want and create a tab and section and in that add this Webresource save it and publish it as shown in the below figure
After Step 2, go to the entity and select which form you want and create a tab and section and in that add this Webresource save it and publish it as shown in the below figure
Step 4
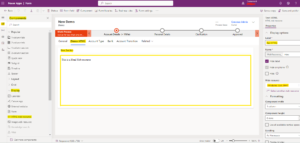
After Step 3, open any record and select Demo Html Tab and observe Selected related field information displayed under tab as shown in the below figure.

After Step 3, open any record and select Demo Html Tab and observe Selected related field information displayed under tab as shown in the below figure.