Import the OpenAPI definition for Power Automate and Power Apps
Sign in to Power Apps or Power Automate.
On the left pane, select Data > Custom connectors

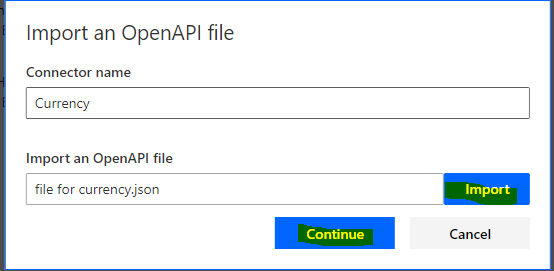
Select New custom connector, and then select Import an OpenAPI file.

Enter a name for the custom connector, go to the OpenAPI definition that you downloaded or created, and then select Continue.
Review general details
From this point, we’ll show the Power Automate UI, but the steps are largely the same across all three technologies. We’ll point out any differences. In this part of the topic, we’ll mostly review the UI and show you how the values correspond to sections of the OpenAPI file.
Make sure the name is set, and then select Create connector.
On the General page, review the information that was imported from the OpenAPI definition, including the API host and the base URL for the API. The connector uses the API host and the base URL to determine how to call the API.

Review authentication type
There are several options available for authentication in custom connectors. The Cognitive Services APIs use API key authentication, so that’s what’s specified in the OpenAPI definition.
On the Security page, review the authentication information for the API key.

We need to check the Definition we pass the action all the think in the action.

The Request area displays information based on the HTTP request that’s included in the OpenAPI definition.

The following section of the OpenAPI definition contains information for the General and Request areas of the UI:
The Validation area displays any issues that are detected in the API definition. Make sure to check this area before you save a connector.
And finally we need to click on the Create connector.
Click on the and select Code Enabled. in action we select our connector

And final Test we need give the connector create API Key as in the below.
https://currencybeacon.com/account/dashboard
We need to test i am passing the INR

The final response.
