
Introduction:-
The Ribbon Workbench for MS Dynamic CRM is a tool written to make customizing the Ribbon easier and quicker. The Ribbon is the user interface element that appears at the top of all recent Microsoft Applications, and was the successor to the old ‘toolbar’. Rather than have a single toolbar that was full of all command buttons and a set of drop-down menus that could be multiple layers deep.
The Ribbon Workbench for CRM was written to provide a ‘drag and drop’ developer experience that allows all customization scenarios to give complete control over your CRM ribbon & command bar
Microsoft Dynamics CRM
Microsoft Dynamics CRM is available as a cloud offering or an on-premises installation. As with CRM 4, this version can be highly customized using advanced extensions. New features include visualizations, dashboards, document management, grid filters, dialogues, recurring appointments, custom activities, goal management, fetch-based reports, MAPI-based Outlook clients, FLS VISITOURS, and more.
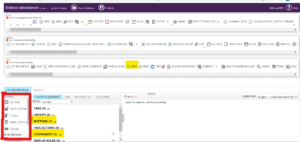
Ribbon Workbench Button
As per the screenshot, we can see the ribbon workbench button in the solution. If this button is not available then we have to import ribbon workbench solution from here.
We need to Create Ribbion Workbench Solution .We just need to create a Solution and add only entity with any views and etc.
Once the ribbon workbench button is visible, we will click and open the solution where we need to add/modify the custom button. To open the solution have to search your solution and click ok.

Once Solution is loaded we will fill following details
1.As per the screenshot, we have to select the entity which entity we need to add custom buttons.
2.The Toolbox where we can choose different types of buttons like (button, split button, button menu, etc.)
3.We can drag the button where we need to show it. We need to set the button id’s
4.We need to set the Button label and tool tip
5.Every button should have a command event
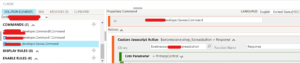
For adding Button Command do the following steps
->Add new command with click on the plus icon
->Set the command id
->Need to add custom JavaScript Action(Library and Function Name)
->Library- Need to search existing JavaScript files and set
->Function Name- set the function name from the JavaScript file.
->After all, details are set we have to publish the current changes.
After publishing our changes we can verify button visibility and click event.
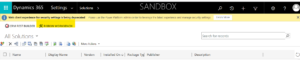
Go back to our environment and refresh the screen and check your changes will be reflected to the form.
Display Rules
Based on the display rules we can Hide/Show the button based on the different rules like entity field values (ValueRule), based on the entity privilege rule, etc.
->Add New Display rule from click plus icon.
->Set the display rule id
->Add display rule (ValueRule) set the entity field name.
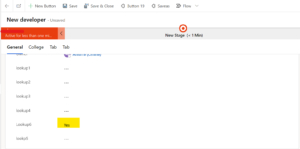
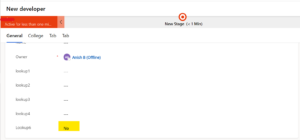
->When we take Yes in the lookup6 field as Yes in the option then the field lookup5 will be show in the form
Enable Rule
->When we take no in the lookup6 field as no in the option then the field lookup5 will be hide in the form
For any Help or Queries Contact us on info@crmonce.com or +918096556344