Azure Logic Apps Introduction
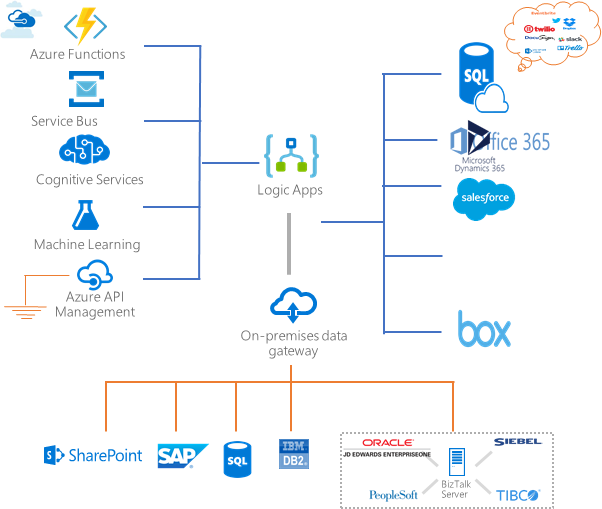
Azure Logic Apps, from Microsoft Azure, is a cloud-based Platform-as-a-Service (PaaS) that is used to automate tasks, workflows, etc. It helps in creating and designing automated workflows that are capable of integrating services, systems, and applications. Azure Logic Apps is used in a majority of organizations and B2B scenarios for developing highly scalable integration solutions.

There are endless tasks that can be automated by Azure Logic Apps. Some of the important and common ones are as follows:
a. Initiating and carrying out schedule send emails and notifications through Office 365. For example, when a new file is uploaded, Azure Logic Apps will schedule and send email notifications.
b. Initiating and managing the routing plus processing of various customer orders across cloud-based services and on-premises cloud platforms.
c. Managing file uploading to Azure Storage from SFTP or FTP servers.
d. Automating marketing processes such as sentiment analysis, tweets analysis, etc.
Key Components of Azure Logic Apps
Now that we have an idea of what the Azure Logic Apps platform means, let us move further to understand what are the various components of Azure Logic Apps:
Workflows are one of the key components in Azure Logic Apps. A workflow is basically a series of processes and actions defined in the form of steps. Whenever an input is fed into the system through logical connectors (discussed later in this blog), a workflow is initiated. Hence, business processes can be automated using Azure Logic Apps by defining workflows for business operations.
The actions and processes that take place in Azure Logic Apps are carried out by logical connectors. These connectors are designed in a way that they are able to integrate and work with user data. Logical connectors have multiple types. However, the two broad categories they have been divided into are predefined connectors and customized connectors. In some situations, it is also possible that ARM templates can be used to define connectors.
Steps to add connectors to Azure Logic Apps
Follow these simple steps below to add and use connectors in Azure Logic Apps:
a. Go to the Azure portal and select the “Create a resource” option.
b. After selecting the above option, we will see a search box on the screen. Enter Logic Apps Custom Connector in the box and select it from the drop-down menu.
c. Now select the “Create” option after entering the Logic apps custom connector
d. Register the chosen connector by feeding in the details.
e. Now select “Review + Create”.
f. Check whether the entered details are correct and click on “Create”
Actions in Azure Logic Apps refer to the steps that are run on the initiation of a trigger. As already discussed, whenever a trigger is created, a series of actions and processes are initiated. Actions will start to run successively once a trigger is initiated. These actions are actually the processes that will be performed based on the pre-decided business tasks and user-provided data. Azure Logic Apps allows the user to choose a specific set of actions from the varied options available in the connector repository.
Triggers are basically the inception of the entire Azure Logic App workflow. Actions, workflow, and processes all are linked to triggers. Without the initiation of a trigger, these components of Azure Logic Apps cannot work. Connectors, in Logic Apps, themselves can initiate various triggers through custom triggers, where custom connectors are used to initiate the triggers.
The following are the steps to initiate triggers in Azure Logic Apps:
a. Go to the Azure Portal and create a blank Logic App.
b. A list will appear in the app itself. Search for the required trigger and select the same.
c. Now, successfully run a trigger in a saved Logic App by selecting the “Run Trigger” option given in the overview section.
Working of Azure Logic Apps?
The working of Azure Logic Apps is based on the actions and processes defined in the workflow. The workflow is initiated whenever an event is triggered.
For example, if we take into consideration a Train booking logic app, whenever a user initiates a booking by selecting a train, the workflow starts running, thereby taking the user through the booking process until the completion of the same. At each step, the values are recorded and transferred to the next step so that the workflow can run smoothly.
Creating a Logic App
To start with other operations in a Logic App, it is first important to understand how it is created. The various steps involved in the creation of a Logic App are as follows:
a. Go to the Azure portal, and click on the “create a resource” option.
b. Now select the “Logic Apps” option from the marketplace section.
c. Click on create to proceed with the final creation of the Logic App.
d. Enter the asked details such as credentials.
e. Now click on “Review + Create”.
f. As the final step, go to “resource” to reach the created Logic App.
Authenticating a Logic App
After learning how to create a Logic App, let us now learn how to authenticate it. In authentication, Azure Logic Apps uses a system-assigned managed identity that can be used with only one single logic app resource and user-assigned managed identity. This system-assigned managed identity can be collectively shared across various other resources. Now, let us learn how to authenticate a Logic App:
a. Go to the logic app resource, which belongs to you or has been created by you in the Azure portal.
b. Now go to the settings menu of the logic app and select the “identity” option.
c. Open the system-assigned section and select “On”.
d. Now save the identity in the “Identity window”.
e. A confirmation dialog box will appear. Select “YES”.
Calling Azure Logic Apps
The steps mentioned below will call a Logic App from an already existing Logic App:
a. In the step from where the other Logic App needs to be invoked, select the “New” step and add an action.
b. A drop-down menu will appear under the “Choose an action” menu.
c. From the drop-down menu, select the “Built-in” option.
d. Next, in the search box, feed in the Logic Apps.
e. After entering the Logic Apps, go to “Activities list” and choose a Logic Apps workflow.
f. Create a Logic App nest in the existing Logic App.
g. Now, all Logic Apps that are eligible for selection will be displayed.
h. From the list, choose a Logic App to call from the current Logic Apps.
Creating an API Connection in an Azure Logic App
The following steps need to be followed to connect an API in an Azure Logic App:
a. Go to “All services” and select “Web”.
b. Select the “API Connections” option from the Azure portal menu.
c. Look for the “All resources” option in the Azure portal menu and select it.
d. Finally, set the “Type filter” to “API Connection”
Benefits of using Azure Logic Apps
Azure Logic Apps offer the most important benefits in the industry for solving various complex business problems:
Azure Logic Apps make it easy to define the right workflow with actions, processes, and triggers through a user-friendly graphical user interface (GUI).
Azure Logic Apps help in the easy integration of Logic Apps with on-premise solutions such as SAP, etc.
When the workflows are defined with triggers and the trigger is successfully initiated, the Logic App is automatically fired.
Azure Logic Apps play an important role in providing support integration with enterprise-level applications such as Office 365, Dropbox, etc.
Azure Logic Apps allow easy debugging through triggers, workflow, and processes running history.
Conclusion:-
It is clear that all organizations need workflows and processes to run effective business operations. Azure Logic Apps is an important mechanism that helps organizations design and run workflows smoothly and easily.
For any help or queries contact us on info@crmonce.com or +91 9014146800

